Recommendations about liquids for Honda


honda spare partsQuestions on oil replacement in the VARIATOR

How often to change oil in the VARIATOR?
Time in two years or through 40 thousand km.

What oil to pour into the VARIATOR?
In the European models special oil for a variator from HONDA CVT flows, in Japanese (right-hand drive) it is possible to pour HONDA ATF Premium. Besides, on a probe in a variator oil which in it flows should be registered.

Questions on oil replacement in the Mechanical Gear box

How often to change oil in the Mechanical Gear box?
In normal conditions of times in two years or through 40 thousand km.,
At rigid operation of times in a year or through 25 thousand km.

What oil to pour into the Mechanical Gear box?
In all Hondas to 94г in the Gear box engine oil with viscosity 10w40 known firms flows, with 94г special oil MTF - "for manual gear boxes" from Honda flows. Considering a climate and specificity of Honda whenever possible it is desirable to replace engine oil in a check point on МТF and by cars TO 94г. Well, and for the lack of МТF - to pour engine oil, but only into cars TO 94г in, later - ONLY МТF.

How often to change the Cooling fluid (antifreeze)?
Time in two years or through 40 thousand in km. If it is standard "dark blue" or "green" antifreeze
And time in 100 thousand or 5 years "red" TEXACO.
There is a weight for a long time the proved firms, not one year selling on the market (and in the world) the products.
It: MOBIL, CASTROL, ELF, TEXACO, BP, ESSO, LIQUI MOLY, MOTUL, RAVENOL, SELENIA, SHELL, TOTAL, etc.
Buying their products you will not lose, and will not be mistaken. I will notice, that TEXACO does "red antifreeze", it does not mix up with "green" or "dark blue" and serves twice longer. Other firms exhaust usually "dark blue" or "green" antifreezes, not the worst quality, and besides interchangeable / mixed among themselves.
I do not recommend to use MANNOL.

Questions on oil replacement in the Automatic Gear box

What interval oil in the Automatic Gear box varies?
Term of replacement of oil depends on type to the Automatic Gear box, and, usually, under normal conditions operation is recommended to change it through 70 thousand kilometres of run of the car (or in 2 years), and through 25 thousand kilometres (or in 1 year) if service conditions are distinct from normal (a hot climate, a cold climate, operation in the conditions of a megacity, constant operation of the car with full loading, etc.). To adhere to replacement target dates follows, if while in service there is no considerable change of quality of oil or you did not get to movement close conditions (have got stuck, long towed other car, etc.). In case of dimness of oil and or acquisitions of a burnt smell it is necessary to replace by it, not waiting planned term of replacement.

How many it is necessary to fill in oils in the Automatic Gear box?
Depending on type, the Automatic Gear box can contain from 4,2 litres (DAIHATSU TERIOS) to 15,5 litres ATF (FORD EXPEDITION). It is necessary to mean, that at replacement merges far do not weigh oil volume. The oil part remains in control system ports, and, besides, is far not all transformers have plugs for plum from them oils. Therefore at an oil drain its part remains in the Automatic Gear box, but it is considered admissible. If you wish to replace completely oil it is necessary two or triple replacement of oil.

What oil to pour in the Automatic Gear box?
dextron 2 (mineral) or dextron 3 (synthetic) from MOBIL, CASTROL, ELF, TEXACO, BP, ESSO, LIQUI MOLY, MOTUL, RAVENOL, SELENIA, SHELL, TOTAL, etc.
It is not recommended to pour MANNOL.
How to replace oil in the Automatic Gear box?
Merge through a drain plug old oil (its part merges ALWAYS only - full single change is impossible) and fill in new through a jellied bore,
Then check up level (see previous article).
Attention: on some cars in the Automatic Gear box there is an oil filter, it is necessary for changing at each replacement of oil.

How to check up an oil level in the Automatic Gear box?
For cars Honda and Acura the oil level is checked at the blanked off engine after achievement of temperature of oil of a working temperature. On a probe for oil measurement in the Automatic Gear box, as a rule, there are some labels. Two top, and sometimes and unique, correspond to an oil normal level, to warm up to a working temperature (90°С). Often this site of a probe is noted by a notch and-or inscription HOT. That oil in the Automatic Gear box has got warm to a working temperature it is necessary to pass kilometres 15-20. After oil warming up in the Automatic Gear box establish the car on an equal, horizontal platform. Pull out a probe from the Automatic Gear box, and dry wipe it. Then insert a probe back into a tube for a probe against the stop and again take. The lowermost, dry place on a probe also will correspond to oil level in the Automatic Gear box. Sometimes on a probe is also the bottom labels corresponding to level of the cold. This label is intended for approximate definition of quantity of the filled in oil in case of its replacement.

What to pour into the steering booster?
To pour only Honda PSF (power steering fluid). IN NO EVENT it is impossible to pour ATF as sometimes recommend some services.
Hydraulic booster Honda PSF liquid happens several kinds, but Hondas (Rovers) love only original liquid Honda PSF. Priming (having added) other liquid in the Hydraulic booster is fraught with consequences if to go not for long, epiploons of the helmsman m will begin to flow, the epiploon costs cents, and work on replacement uneasy (at Accord CE and Civic MA in general it is impossible that the steer does not understand). If to go longer, up to failure of pump Gidro of the Booster. But the liquid happens different: the first - liquids "as the spare part" are liquids in packings of 1 and 4 litres, manufactures Japan, the price nearby 20$, other liquid - manufactures USA in packing 0,33л, the price nearby 2,7$ for bank, but for Europe it is ordered as "accessories" under the catalogue by number 082069002. So address to official dealers Honda, demand a liquid as accessories, after all it is twice cheaper (though they about it can and not know).

And what about capacity for example at Civic? Civic'и happen different, for example Сivic "96 (EJ9, EK1, EK3, EK4...) system Capacity - 0,85л., tank capacity - 0,4л., total: 1,25л.
Whether Еcть experience of commixing native and American? Only Genium Honda PSF, and the manufacturer - any, American PSF makes American Honda Motor Co., and the liquid has catalogue number, as any original spare part Honda. As far as I know, Honda the liquid structure keeps a secret and the licence for manufacture of liquid PSF gave nobody. And for liquid Johnsen's power steering fluid for Honda cars I tell I can nothing, besides, that it is a liquid STEREOTYPED. At the best, the structure of this liquid is approximately similar to structure original Hona PSF, in the worst this liquid is made on Small Arnautsky. In any case, I think to risk it is not necessary, and if a fluid level in a car tank even below the minimum mark terrible in it anything is not present, after all the fence a liquid to be made from the bottom branch pipe, and the top branch pipe is return. And that there would be no doubts what to pour, it is necessary to glance in the catalogue of applicability of oils for Honda any large firm, for example Mobil in which it will be written about the following: 'the Servocontrol: the Special (original) liquid for a servocontrol (Honda V)'
READ MORE - Recommendations about liquids for Honda

Honda Civic Parts | Engines (SOHC)


Honda Civic parts, engines with one camshaft (SOHC):
An arrangement of components:

Honda Civic Parts - engines D14A3, D14A4, D15Z4, D15Z5:
honda civic parts
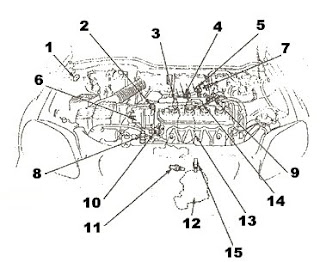
1. A car speed sensor
2. The electromagnetic valve of system of removal of steams of fuel (engine D14A3, D14A4)
3. The gauge of position of a throttle valve
4. The gauge of an absolute air pressure
5. The gauge electric loadings (engine D15Z5)
6. Air temperature detector on an admission
7. Gauge VMT
8. The electromagnetic valve of steering of blocking (models with an automatic gear box)
9. The pressure control device of the booster of a steering (engine D15Z5)
10. A cooling fluid temperature detector
11. The valve of steering of idle running
12. The oxygen gauge (engine D14A3, D14A4)
13. A three-componental catalyst converter (engine D15Z5)
14. A three-componental catalyst converter (engine D14A3, D14A4)
15. The oxygen gauge (engine D15Z5)

Honda Civic Parts - engines D16Y4, D16Y9:
honda civic parts
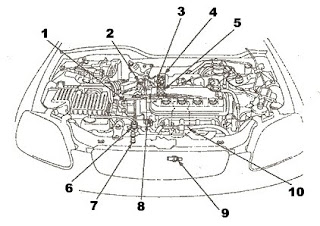
1. Gauge VMT (on the distributor)
2. Air temperature detector on an admission
3. The gauge of position of a throttle valve
4. The gauge of an absolute air pressure
5. The valve of steering of idle running
6. A car speed sensor
7. The electromagnetic valve of steering of blocking (models with an automatic gear box)
8. A cooling fluid temperature detector
9. The oxygen gauge (engine D16Y4)
10. A three-componental catalyst converter (engine D16Y4)

Honda Civic Parts - engines D14A3, D14A4, D15Z4, D15Z5:
honda civic parts1. An air filter
2. A cable of a drive gear of a throttle valve
3. The resonator
4. The valve of system of ventilation of a crankcase
5. The throttle valve case
READ MORE - Honda Civic Parts | Engines (SOHC)

VOLKSWAGEN HAZARD SWITCH WIRING DIAGRAM


Over the years, I have received inquiries regarding the proper wiring of the Hazard (Emergency) Light Switch installed on various VW models. The purpose of this PDF is to consolidate the answers to those inquires and provide proper wiring instructions so that you can have Hazard Lights that actually work. This PDF is divided by VW model, beginning with Standard Beetle, Super Beetle (71-72), Karmann Ghia, Type 2, Type 3 and Type 4.
READ MORE - VOLKSWAGEN HAZARD SWITCH WIRING DIAGRAM

How to Turn off a Pulley Bolt of a Kneeshaft?


honda spare parts
Reliable motors are done by Honda, only puts them not as everything, belts to the right, and on the contrary. Accordingly they also turn in the opposite direction - counter-clockwise. Insignificant, at first sight, distinction sets thinking, when it is necessary to turn off a pulley bolt of kneeshaft. To do it it is necessary at least each 100 thousand in km - for replacement of belt GRM, but there are also off-schedule works: epiploon replacement, for example. The bolt huge for a head on 17 moment 185 Н-м is tightened and to turn off it, the effort is required much more.
To shift a bolt, scrolling the engine a starter, it will not turn out: a rotation direction not that.
The engaged drive and the pedal of a brake pressed in a floor too do not help - transmission springs, but the bolt does not surrender. On old cars in a clutch crankcase there is a window opposite to a flywheel wreath, and some try to stop its mount or sharply sharpened breakage. Such duel of the person with car at times comes to an end with the spilt blood or an unwrapped crankcase, and happens, both that, and another. In a pulley it is provided hexahedron cut under a firm key. Only here hexahedron on 51 with a bore under a head on 17 on sale not to find, and to order for single works - expensively. Meanwhile preparation for a special key is on sale in any market: a lock nuthonda spare parts
Radiators on 54, an inner diameter (on a thread) - 39 mm, width - 10 mm. We recut its sides on 1,5 mm, we weld the strong flat handle in length of 180-220 mm - the tool is ready. On some pulleys corners between cut sides are rounded, therefore and on a nut it is possible to cut reciprocal parts a few. We turn on a bolt a head on 17 with the extension piece and the powerful handle.
It is possible to weld the ground preparation on a VAZ key for a bent shaft nut - the universal wrench VAZ-Honda will turn out. The handle is convenient for establishing on a drive axis of a front wheel.
That the key has not come off, we establish the extension piece on a reliable support. At times even a wheel to remove not necessarily, however if tyres of more diameter, than regular are established, a wheel it is necessary to remove or use nevertheless a key with propshaft.
READ MORE - How to Turn off a Pulley Bolt of a Kneeshaft?

Honda Repair - First Questions


honda spare partsAs though the Japanese manufacturer did not guarantee reliability of the car Honda, to repair it nevertheless to have. As is known, Honda with solid run starts to get problems with the engine, but for skilled mechanics will not make difficulties to eliminate any problems injector engines. Often happens, that repair of second-hand car Honda is necessary long and expense when it is necessary to change a belt, a pomp, levers, a drive gear, a box, a beam under the engine, thoroughly to do all rear suspension, to repair the muffler, brake plates, pads etc. By independent search happens difficultly to find the necessary spare parts. Sometimes happens so, that owners of Honda use poor-quality fuel, than subject the engine to unjustified loadings. Qualitative cleaning of the choked up spray jets can essentially change a situation to the best. Breakage of an automatic gear box should not upset owners Honda, to establish other box in house garage it is possible. In following posts I will tell as it to make. Honda enters into maintenance operation and car repairs replacement saylentbloks and dusters shrus, absorbers, brake plates and pads, racks - barrels of stabilizers, muff a rear reducer and, certainly, regular replacement of oil and filters more often.
READ MORE - Honda Repair - First Questions

1991 TOYOTA MR2 ELECTRICAL WIRING DIAGRAM


This wiring diagram has been prepared to provide information on the electrical system of the 1991 Toyota MR2. This manual provides information on the electrical circuits installed on vehicles by dividing them into each system circuit.

The actual wiring of each system circuit is shown from the point where the power source is received from the battery as far as each ground point. (All circuit diagrams are shown with the switches in the OFF position. When troubleshooting any problem, first understand the operation of the circuit where the problem was detected (see System Circuit section), the power source supplying power to that circuit (see Power Source section), and the ground points (see Ground Points section). See the System Outline to understand the circuit operation.

When the circuit operation is understood, begin troubleshooting of the problem circuit to isolate the cause. Use Relay Location and Electrical Wire Routing sections to find each part, junction block and wiring harness connectors, wiring harness and wiring harness connectors, splice points, and ground points of each system circuit. Internal wiring for each junction block is also provided for better understanding of connection within a junction block. Wiring related to each system is indicated in each system circuit by arrows (from-, to-). When overall connections are required, see the Overall Wiring Diagram at the end of this manual.

Table content Toyota MR2 Electrical Wiring Diagram
  • Introduction
  • How to use this manual
  • Troubleshooting
  • Abbreviations
  • Glossary of terms and symbols
  • Relay locations
  • Electrical wiring routing
  • Power source (current flow chart)
  • System circuits
  • Ground points
  • Electrical wiring digrams
READ MORE - 1991 TOYOTA MR2 ELECTRICAL WIRING DIAGRAM

Crankcase protection on Honda - whether is necessary it?


honda spare partsHere words of the most authoritative Honda expert:
All that will be told concerns all models of Honda irrespective of year of manufacture further.
Radiator air intakes are located low, at car movement under the bottom the zone with the raised pressure is formed. Protection installation will break ventilation of a motor compartment and will lead to an engine OVERHEAT. It not simply my personal opinion it is supported by the official answer of service department of Honda to this important enough for many a question. To all I advise to choose speed corresponding to road conditions, and those who would like to go on stubs in wood should think of purchase of one more, more suitable to these purposes of the car.
P.S. It is not necessary to listen to those who will confirm that it goes with protection for a long time already. You recollect my words when the motor of your car will overheat.

P.S.S. At all models it is established powerful front cross-section, and also the longitudinal beam which perfectly protects the engine from damages.


READ MORE - Crankcase protection on Honda - whether is necessary it?

2001 SUBARU LEGACY WIRING DIAGRAM AND ENGINE ELECTRICAL SYSTEM


This service manual has been prepared to provide SUBARU service personnel with the necessary information and data for the correct maintenance and repair of SUBARU vehicles.

This manual includes the procedures for maintenance, disassembling, reassembling, inspection and adjustment of components and diagnostics for guidance of experienced mechanics.

Please peruse and utilize this manual fully to ensure complete repair work for satisfying our customers by keeping their vehicle in optimum condition. When replacement of parts during repair work is needed, be sure to use SUBARU genuine parts.

Table content of Subaru Legacy Wiring Diagram and Engine Electrical System
Basic Diagnostics Procedure ~ Working Precautions ~ Super Multiple Junction (SMJ) ~ Power Supply Routing ~ Ground Distribution ~ Airbag System ~ Air Conditioning System ~ Anti-lock Brake System ~ A/T Control System ~ Audio System ~ Charging System ~ Combination Meter ~ Cruise Control System ~ Door Lock System ~ Engine Coolant Temperature Gauge System ~ Engine Electrical System ~ Fuel Gauge System ~ Full-Time Dual-Range System ~ Front Accessory Power Supply System ~ Headlight Beam Leveler System ~ Horn System ~ Immobilizer System ~ Keyless Entry System ~ Back-up Light System ~ Clearance Light and Illumination Light System ~ Front Fog Light System ~ Headlight System~ In Compartment Light System ~ Stop Light System ~ Turn Signal Light and Hazard Light System ~ Oil Pressure Warning Light System ~ Outside Temperature Display System ~ Parking Brake and Brake Fluid Level Warning System ~ Pneumatic (Air) Suspension System ~ Power Seat System ~ Power Window System ~ Radiator Fan System ~ Rear Accessory Power Supply System ~ Rear Fog Light System ~ Rear Window Defogger System ~ Remote Controlled Rearview Mirror System ~ Seat Belt Warning System ~ Seat Heater System ~ Starter System ~ Sunroof System ~ Vehicle Dynamic Control System ~ Wiper and Washer System (Front) ~ Wiper and Washer System (Rear) ~ Wiper Deicer System ~ Overall Systems ~ Front Wiring Harness ~ Bulkhead Wiring Harness (In Engine Room) ~ Bulkhead Wiring Harness (In Compartment) ~ Engine Wiring Harness and Transmission Cord ~ Instrument Panel Wiring Harness ~ Rear Wiring Harness ~ Door Cord ~ Rear Wiring Harness and Trunk Lid Cord ~ Rear Wiring Harness and Rear Gate Cord
READ MORE - 2001 SUBARU LEGACY WIRING DIAGRAM AND ENGINE ELECTRICAL SYSTEM

Why pads and how with it to struggle non-uniformly wear out?


honda spare partsFront brakes on the majority of cars of mark Honda (and not only) have a design with one brake cylinder in a caliper. At such design that by means of one cylinder to press two pads to a brake plate, pads should is in a metal buckle. I.e. the brake cylinder presses the bucket on one of pads, and a rear on a buckle which being displaced presses the second pad to a disk. It is clear, that this buckle should not be fixed rigidly, and should have possibility of free conveyance. (So-called " The floating buckle ") For this purpose, a buckle fastens to a swivel member through directing on which it should move. Guiding are greased by special lubricant and are protected duster from moisture and dirt hit. From time, deterioration and wrong repair leakproofness duster can be broken, the dirt and water gets to the directing, and they start"to sour". Even when this process only begins, work of brakes is already broken, and if he has had time to come far enough to restore working capacity of this knot sometimes happens absolutely uneasy. From the point of view of the driver, this failure can be shown differently. Brakes start to work at more pressing a pedal, there can be extraneous sounds, pads will non-uniformly wear out. And non-uniformity can be different character - deterioration of one pad much more, than another at"souring"of both directing, and deterioration of pads under a corner, at "souring"of one of them.
After you turn off two bolts of fastening directing, you can remove a buckle with a brake cylinder, covering brake blocks. Each guiding represents the barrel in which the bolt is twisted and on which ends are put on dusters. This barrel should move freely (fingers) along the shaft concerning a buckle. If it does not occur, it is necessary for backing out improvised means, not having damaged. Do not try to remove duster, not having taken out a guide bush - it has a special design, being simultaneously and an epiploon and to remove it not having taken out a guide bush it is impossible. Besides, dusters it is made of rubber which is not oilprotection, therefore it cannot be washed out gasoline or other solvents. Because of it to grease this knot it is possible ONLY lubricant specially intended for it. That this knot has started to work normally and has got though any reliability, it is desirable to replace dustera. It is not so expensive. After clearing of details, lubricant and assemblies guiding should move freely hands, and the buckle with directing can be established into place.
Wrong replacement of brake blocks can be a partial cause of defect of this knot. At correct replacement of brake blocks, it is necessary to remove this buckle, at the same time checking the directing. It allows to define in time necessity of their dismantling and lubricant. Some, at replacement of pads remove a caliper entirely, leaving guiding to "sour" further. And it is unequivocal, absolutely imperceptible damage dusters pads directing at replacement can be the "souring" reason even.
It is necessary to apply to lubricant only special high-temperature (not less than 200 C) lubricant since brakes strongly heat up, it usually happens in the repair complete set of calipers or is on sale separately.
READ MORE - Why pads and how with it to struggle non-uniformly wear out?

Honda Corps Repair - the General Questions


honda spare partsAny expert will tell, that Honda corps repair is a difficult, highly technological problem which demands a profound knowledge and presence of the modern equipment. The corps of any Japanese car represents the high-precision metal design which details are adjusted and sewed industrially. Honda corps repair and its subsequent painting is some layers of the expensive paint and varnish covering which ideal restoration is possible only in the presence of the specialised equipment and firm materials. Among other things, qualitative Honda corps repair provides necessary passive safety of the driver and the passenger. Honda corps repair is made for the car according to the aerodynamic characteristics of separate model, and account materials steal up under the checklist.
Optimum repair of a Honda corps assumes work not only with external characteristics of the car, but also with technological features. Allocate capital and cosmetic corps repair Honda. On restoration of appearance of a corps of the car it is possible to carry To cosmetic works: repair of a bumper Honda, removal of easy indents and scratches, local improvements. If there is a necessity, spend nopainting Honda corps repair.
Honda corps repair frequently assumes drawing of an additional paint coat over the old. Painting and Honda corps repair is always made according to checklist data, otherwise, it is possible to pick up the account material mismatching characteristics of the car. Make painting of a corps Honda on technologies which allows to use a minimum of a paint and varnish covering. Major repairs of Honda corps engage full replacement of separate details by means of the advanced equipment. I have an experience of Honda corps repair which assumes practically 100 % replacement of external elements.
Depending on colour of the car Honda, кузовной repair can locally be spent, that is, without deformation of a factory paint and varnish covering on all area of a detail. It is necessary to understand, that, for example, local corps repair of Honda Civic will be limited, in comparison with easy off-road car CR-V. The matter is that corps repair of Honda Civic becomes complicated compactness of the car which has a minimum of the latent places, and local repair is recommended to be spent only in imperceptible places. In the rest, repair of Honda Civic corps does not differ from works which are given for other cars of the Japanese manufacture.
Corps repair of Honda Accord, in turn, has a number of prominent features. Considering dearness and geometrical complexity of the car, repair of corps elements Accord it is necessary to make with use of the most expensive account materials and the newest equipment.
As a whole, irrespective of, whether it be or others corps works, them it is possible to execute repair of bumper Honda Accord, repair of bumper Honda Civic and in house conditions.
READ MORE - Honda Corps Repair - the General Questions

1980 MAZDA RX-7 WIRING DIAGRAM


This 1980 Mazda RX-7 wiring diagram has been prepared to provide information on the electrical system of the 1980 Mazda RX-7. This manual provides information on the electrical circuits installed on vehicles by dividing them into each system circuit.

In this booklet, thewhole electrical system is divided into sub systems, such as charging system, ignition system, and so on. Index shows on which page sub system is found and which page each component belong to. Each system is hown on right and left pages. The upper part of the left page shows the electrical circuit and the lower part hows the configulation of each connector. Right page shows the actual location of each connector and the routing of the harness in the vehicle. The last page X shows the common connectors related to each sub system. All information in this booklet are best available at the time of printing. Toyo Kogyo reserves right to make changes in circuit and specifications without preious notice.
READ MORE - 1980 MAZDA RX-7 WIRING DIAGRAM

Types of Honda Engines


honda spare partsThe first letter in the name of Honda engines specifies in an engine accessory to a certain series. Also as well as at other Japanese engines, at HONDA engines of one series are structurally similar, but can differ on speeding up degree, a working volume and other characteristics.
Examples: F20B, F18B, D17A, J35A.

Following two letter show an engine working volume, having divided the number consisting of these figures, on 10 we will receive a working volume in litres.
Examples: D17A (volume of the engine of 1,7 l.), D15B (volume of the engine of 1,5 l.), E07Z (engine volume - 0,66 l.).

Last letter (there are letters A, B, With, Z) designates engine version in series, engines with the letter And are the first versions, then there are engines with In, last version becomes C, letter Z is applied only to engine E07Z.
Examples: L13A, F22B, B18C.

Old engines HONDA have the name from two letters from which to learn any information it is impossible. An example: ZC (it was established on model Integra up to 2001, was both in carburettor, and in an injector variants).
READ MORE - Types of Honda Engines

Honda Spare Parts - Why?


honda spare partsWhy I have decided to create this blog? Already more than twenty years I maintain and I repair cars and motorcycles Honda. For this time at me many materials on spare parts, the equipment and features of repair of various models Honda were going to. Agree, it is much better to save money, carrying out small and even average repair of the car or a motorcycle in house garage. As the fan can make such repair even. It is necessary not to be lazy only. And at you it is obligatory to turn out. So, if you the happy owner of the car, a motorcycle or other technics of Japanese firm Honda - this blog for you. I will tell to you how correctly to pick up spare parts and independently to repair or carry out preventive maintenance of your technics. I will be very grateful, if also readers of a blog share the skills and secrets. After all - all of us HAPPY OWNERS HONDA!!!
READ MORE - Honda Spare Parts - Why?
 
Copyright Car Wiring Diagrams All Rights Reserved
Powered by Home Recordings
ProSense theme created by Dosh Dosh and The Wrong Advices.
Blogerized by ExTemplates.com Blogger Templates.